Thursday, February 28, 2013

Butterick Spring Release

There are two things I love about Spring.  1) I get to see the sun again!  and 2) all of the pattern company's release pretty new patterns to get our sewing juices flowing again!

Last week I showed you Vogue's new book and this week we'll take a look at Butterick's latest offering.

It's their 150th anniversary!
This dress is probably the most eye-catching of the new patterns.


There's a version you can make without the sleeves that I think is more wearable.

The dress from the catalogue cover:


If you're into that whole short in the front, long in the back trend, here's a skirt pattern for you.  As much as I hate the trend I know I'll probably be wearing one in about 6 month's time.  (I'm a little slow on the trends.)


Gertie, everyone's favourite retro sewing blogger from Gertie's New Blog for Better Sewing has two new patterns in this book.  It's very pretty, but the 50's just isn't my era.


And there are a few cute new patterns for little girls.  I just told my mom the other night that I needed a leggings pattern for my niece, and here it is!  I'll definitely be buying this one (at the next pattern sale!).


There are lots more but these are the ones that stood out to me.  Any favourites for you?  Leave a comment below~

Wednesday, February 27, 2013

Pencil Skirt

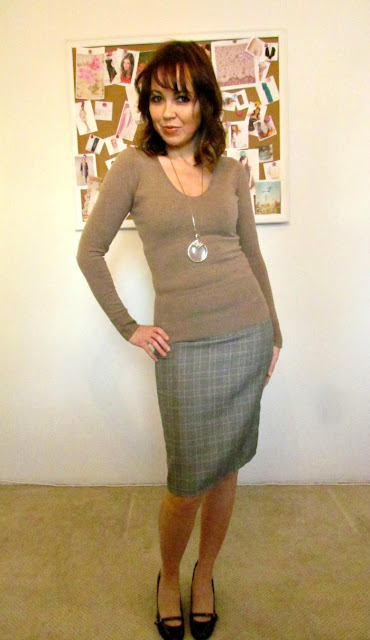
So, I made this skirt last week.  I didn't think it was a big deal, it's just a plain old pencil skirt...so I wasn't even going to do a post on it.    And then I tried it on....

Dress it down with a sweater.
I really L-O-V-E this plain old pencil skirt!  It's like magic.

Here's the lesson ladies...just make your skirt the tiniest bit more snug than you think you should, pair it with a pretty blouse, cinch your waist with a great belt, and add just a bit more colour to your lips than you normally would and va-va-voom!


You will feel like a 60's bombshell that just stepped off the Mad Men set.  (I know I don't have the curves of a real '60's bombshell, but I still feel good in this skirt~)

It's surprising what you can do with a metre of $2.00 fabric from the bargain bin isn't it?!?!


It's just some kind of wool gabardine but I love the line of taupey brown line in it, it makes it so much more wearable with other colours.

I used this pattern from Vogue but like I said above, a pencil skirt is a pencil skirt, any pattern will probably look almost exactly the same as this one.


You can see some other pieces I made from this pattern here and here.

What's your favourite style of skirt?  Leave a comment below!

Tuesday, February 26, 2013

Vintage Patterns Wiki-Swimwear

If you love vintage patterns as much as I do then you've probably heard of the Vintage Patterns Wiki:


If not, then let me introduce you....It's an amazing collection of thousands of vintage patterns, as well as a community of other vintage pattern enthusiasts.

It can all be a bit overwhelming but there are lots of ways you can search the patterns:


When you find a pattern you fall in love with, if there are vendors selling it, you can link to their website and purchase the pattern.  It's a great one stop shop for collectors.

Over the weekend I got lost while looking at the vintage bathing suit patterns!  Here are just a few of my favourites:

This one doesn't look that old, probably 1980's
but I love those bottoms~

I LOVE Marlos Corner patterns and have never come across this one before.
Love that one piece...so classy!

I just think this is such a funny combination of items to have in one envelope,
but it was the '60's and everyone lounged in evening wear
after a day at the pool~

I'm not even all that crazy about this swimsuit
but I do LOVE the illustrations from this period of McCalls.
I always find it hard to resist buying this illustrators patterns when I come across them.
They're just so quintessentially 70's.

I love looking at bathing suit patterns and collecting them.  I just wish I was better at sewing bathing suit patterns.  They are my nemesis.  But I will try again this summer and maybe, just maybe, I'll find the one that works.

How about you?  Do you sew swimwear?  Any tips or tricks to share?  Leave a comment below.

Monday, February 25, 2013

Leggings Galore

No, that's not my new 007 code name....that's just what I'm surrounded by!

There's another navy pair that's already in the wash too~
I started making leggings last weekend and can't seem to stop!


I'm not going to model them all for you, leggings are leggings.  Plus, I'm not feeling very 'modelly' today.

I used the same pattern I did for my warm winter leggings I showed you in January.

McCalls 6173
This is an awesome pattern!  The legs only have one inside seam and come together in no time at all.  I'm having fun trying out all different kinds of knit fabrics.

I can't help but remember back to the '80's when we used to wear leggings, only back then they had a little strap of elastic that went under the foot and we called the stirrup pants.  They were all the rage.

Then I realized, every decade has had it's own version of leggings.  Do you remember when you had your first pair?  Leave a comment below~

Friday, February 22, 2013

I'll Be Back

Just need to take a short break this week~


I'll be back next week with more fun sewing and crafting projects.

Thursday, February 21, 2013

New Spring Vogue Release

Yesterday I mentioned that Vogue release a new set of patterns, so let's take a look at some stand-outs.

Wrapping and ruching certainly seems to be the trend over at Vogue this season:

V1342, V1341,  V1339, V1338
There are LOTS of ill fitting dresses to choose from:


Both of these models are beautiful, but I think they made all of their outfits too big.  Look at how that teal dress is falling, and above look at the armhole on the yellow dress.  I think they have to stand in such weird poses just to get the outfits to look good.

But strangest of all is this one...because it's supposed to look this way:


Now I know Vogue is supposed to be all avant garde and everything, but since when did looking like you just had a bar brawl become fashion?

So, here's the thing, I love Vogue patterns.  I usually drool over the beautiful designer dresses and blouses all the time, but I'm just not crazy about this release. I know I couldn't pull off any of these looks.  How about you?  Are you going to dive in and wrap, roll, and tear?  You'll be more fashionable than I~

To top off the strangeness, check out their newest pattern that is being released on the web only.

Wednesday, February 20, 2013

Easy Vogue Blouse

Here's a cute blouse for the office that I finished up this past weekend:

Vogue4819, vogue patterns, v4819

There's nothing particularly special about it but I thought it would look pretty swanky with a black pencil skirt.  It has a bit of detailing at the neckline and in the back, with some lovely bishop's sleeves-which look nice but I have to admit that they do restrict your movement.

Here's a close-up of the fabric.

Another bargain bin steal~
I used Very Easy Very Vogue pattern V4819.  Unfortunately, it looks like it's out of print.  The good news is that if you buy directly from the Vogue website, ALL patterns are on sale right now for only $4.99 (ending today- Feb 20, 2013), that includes their brand new stock which was just released! (I'll showcase a few of them tomorrow).

V4819

Do you ever splurge and use Vogue patterns?  Leave a comment and tell us your favourite one below!

Monday, February 18, 2013

Clay Cameos

Take a look at this month's Wholeport project!

clay jewellery, DIY Cameo, Clay Silhouette, polymer clay jewellery

I've been playing around with polymer clay for awhile but have never tried making cameos...until now!

Here's what I ordered to get me started:

All of this for $30!
Here are some close-ups:

The molds have lots of detail and are really flexible,
making it easy to get the clay out of them.

This clay is way softer than anything I've ever
tried from Sculpey or Fimo.

Just as I thought, making cameo's with molds is easy, but you need to be prepared to take your time.

Steps:
1) Start with a very small piece of clay.  This will fill the silhouette part of the piece.  Gently push it into the mold being very careful not to go outside of the design.  Don't put in too much or it will overflow into the background.


2) I didn't know I was getting the tools too, but I'm so glad I did.  They came in super handy when pushing the clay into the little tiny crevices.


3) Take another very small piece of clay in a contrasting colour.  Flatten it out and spread into the rest of the mold to create the background.


4) Roll across the back to even everything out.


5)Pop your pieces out and bake.  (This clay also says it can be boiled!)

Obviously I still need some practice~

Here are the other pieces I made with the other molds:


This was after they were baked.  You can see how well the clay keeps it's original colour.


Then I just glued the cameo to a metal cabochon frame and adhered to a ring finding and some lace for a bracelet.

You can find everything you need to make your own clay jewellery at Wholeport.com.


Did you know that Wholeport also has a FREE sample program?  Check it out!

*This is a sponsored post however all opinions are my own.  All supplies were provided free of charge however I did not receive any monetary compensation.

Friday, February 15, 2013

Metal Works

Add a little shine and pizazz to any old sweater with sparkly elbow pads!

DIY elbow pads, embellishing a sweater

I had this great cashmere sweater in my closet.  It's lovely just the way it is, it's just a little boring that's all. So, let's get to work!

Here's what you need:

Materials:
-Sweater
-standard sewing kit
-stretchy metallic fabric (I used spandex)
-1 piece of paper, ruler, craft knife, and cutting mat

Steps:
1) Make a pattern for your elbow pads.  That way they'll be exactly the same.  Cut a piece of paper to 4.5" X 6.5".


2) Round the corners.

3) Use your pattern to cut out two pieces from your fabric.


4) Sew 1/4" all the way around your pieces and then clip the corners.


5) Use your stitching line as a guide for turning.  Turn your edges along the sewing line and lightly press.  Sew close the edge securing your edges.


6) Find the elbow placement for each pad and pin.

This sweater is only 3/4 length sleeves
so that's why it's so close to the cuff.

7) Hand stitch each pad onto your sweater using your stitching line from step 5 as your guide.


There you go!  Your sweater is extra special now!


When I first envisioned this project I was going to use sequins but I found this sparkly spandex at my local fabric store for about a tenth of the price and decided to change my plan, plus spandex is so easy to work with, I thought it was the better choice in the long run.  You could try a printed cotton but be careful of bunching.  You may have trouble bending the elbows. 

Experiment though, if they don't look quite right they're easy enough to remove and try again.

I've got so many projects planned for this weekend!  I can't wait to show you them all next week.  What are you working on?!?!

Have a crafty week~

Linkwithin

Related Posts Plugin for WordPress, Blogger...