Friday, October 31, 2014

Christmas Luminaries

Christmas crafting?!?!  If you're a fellow blogger you're probably wondering what's taken me so long to get into the Christmas spirit.  If you're someone who just reads blogs, you're probably thinking it's Halloween today?!?!  Why is she making Christmas projects?!?!?

But here in Blogland it's been Christmas for quite some time, so I thought I better get with it.


Here's what you need to make your own quick and easy Christmas luminaries:


Materials:
-glass jars
-Mod Podge and sponge brush
-pretty papers
-measuring tape
-cutting machine or scissors/craft knife
Optional: Sparkle/Glimmer Mod Podge

Steps:
1) Clean out your jars and remove all of the labels and glue.  Then measure the distance around the body to see how long to make your cut out design.

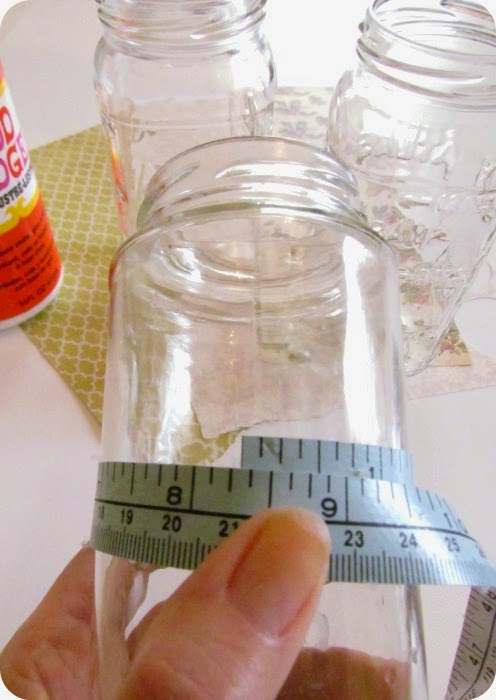
overlap just a bit so that you
don't have any gaps in your design
While you're at it, measure the maximum height of the body of the jar to determine the height of your design.

2) Use your cutting machine, or freehand, create your cutouts.


I used my Silhouette and made 2 wintery Christmas designs and one with, of course, butterflies.


I made the butterfly design myself~

3) Slap a good layer of Mod Podge onto your jar.


4) Adhere each paper cut out to a jar.  Add more Mod Podge on top to secure everything.


5) If you want to add just a little extra something, add a layer of Sparkle Mod Podge on top.  I had some Martha Stewart glitter decoupage glue in my stash so I decided to try it.  It's not bad, but I found that it wasn't enough.  I went back over it again with Mod Podge Sparkle (the pink label).  The Mod Podge glue has a much bigger sparkle/glimmer factor.


Let everything dry overnight and then just drop a candle inside and watch the magic happen...


I can't capture the glitter in a pic but it's so pretty.  It looks like snow falling down on the trees.  And I love how the birch tree cut outs glow.


Yay!  1 Christmas craft down, countless more to go.  Have you started Christmas crafting yet?  Leave a comment below~

Wednesday, October 29, 2014

Pattern Collection Tour - Drawer #2

Want to see what's in drawer #2 of my Sewing Pattern Collection?


Watch the video below to find out (I'm going to show you my all time favourite sewing pattern)!

Ooooh!  I see some Vogue!

If you missed Drawer #1, you can see it HERE.

Next week I'll share the last drawer, my favourite, the Vintage Pattern Drawer~

Where do you keep your pattern collection?  Share with us below~

Sunday, October 26, 2014

Make it Monday

Welcome back to the Make it Monday Party!  I was the lucky duck in charge of picking features this week!  Here's just a small sample of all of the great projects shared last week~


1. Autumn Sweater from Ana Love Craft   /   2. Papercrafts from Sum of Their Stories
3. Bobble Stitch Wrist Warmers from Happy in Red  / 4. Marble Dipped Mug from House of Hipsters

You ladies are all so talented!  If you were featured grab a button and brag about it:

Party Every Monday Night

Now onto this week's party~
Tamara, Donna, Mitzi
I made this pretty just for you so please take a second and have a look.

Party Every Monday Night
Let's Party!

Sunday Inspiration


I know there are people out there in the world who think an entire country mourning the loss of one man is foolish, but I'm proud to be Canadian. And I'm proud that we don't think that what happened in Ottawa last week is normal.

#OttawaStrong

Friday, October 24, 2014

Simple Trick or Treat Bag

Do you have some little goblins that you have to take out Trick or Treating soon?  Here's a fast and easy project to help you gather their goodies~

DIY Treat Bag, DIY Halloween Bag, Spider Bag


Here's what you need to make your own Trick or Treat Bag:
-Non stretch fabric
-ruler
-standard sewing kit

This is so easy and I was just whipping these up as a little scrapbuster so I didn't decide to do a tutorial until I had already completed a few steps.  Also, you don't have to follow these measurements exactly.  I was just using up a scrap of fabric I found tucked away and was just trying to use it all up.

Steps:
1) In any case, I cut 2 pieces of the large rectangle shape and 2 of the long skinny one. (That's 17" right from the top to the very bottom of the big one, just ignore the cut outs at the bottom until the next step.)


2) Now you can cut out 2 little squares from each bottom corner of the large piece.  Mine are about 1 3/4" square.


3) First we'll make some handles.  If you don't have enough fabric or you want something really sturdy you can use webbing.

Simpy fold each long skinny rectangle, right sides together, and stitch along the the entire long edge.  Zig zag or serge and then turn and press the seam along the centre back.  I'm using some kind of nylon lining type of material so kept my iron quite low and used a pressing cloth to make sure I didn't melt it.


4) Set your handles aside and stitch the bottom and two sides of the main body of your bag. Finish your edges (!) and press to one side.


5) Now pinch the bottom corners, meeting your side seams with your bottom seam.  Pin and stitch across.  You should get some nice sharp boxy corners.  If you're using a heavier fabric you might need to trim across the corners.  Finish the edges and turn your bag body right side out.


6) Finish the top edge of your bag body, fold about 1" towards the inside and stitch down.


7) Now just attach your handles.  Measure in an equal amount from each side and mark.  Turn the bottom of you strap up about 1".  Pin to mark and stitch down in an "x" pattern.  You'll want to collect as much candy as possible and this will make sure that your straps won't fall off half way through your neighbourhood rounds.


That's it!  Just throw on that Elsa costume that all the girls are wearing and head out from some treats!


I sent my bags to my niece and nephew along with a couple of little easy to  make pillow treat boxes.

Check out my Sharp Corners Ahead project and use the boxy corner method to make a cushion.

Are you dressing up this year?  Did you make your own costume?  Leave a comment below! (I've made some adjustments to my comment settings, help me out by testing it to see if it's any better, thanks)

Thursday, October 23, 2014

Book Winner!

Thank you so much to everyone who entered to win Mary Pat Hyland's newest novel.


The winner of the giveaway is....


Congratulations Maria! 

The author will be in touch with you soon with your 
copy of the book so that you can start reading right away~


Wednesday, October 22, 2014

Pattern Cabinet Tour

Most of you know that although I post loads of crafting, jewellery making, and other projects, but I'm really a sewer at heart.  It's my first love and I've been doing it since I was very young.

That means that I've been collecting things like fabric, notions, and patterns (and patterns and patterns) for a very long time.

Sewing Pattern Collection


Today I'm going to begin a little tour of where I keep my patterns and share some of my favourites with you.

This is a video tour of drawer #1.  I'll continue over the next couple of weeks with peeks into the other two drawers so make sure to come back to see what other hidden treasures we find~


If you want to see the rest of my creative space you can check out the little mini make-over I did a couple of years ago.

Sunday, October 19, 2014

Make it Monday

Welcome back to the Make it Monday Party!

If you want to see if your project was featured this week, head over to Distressed Donna Down Home to see what she picked~

Party Every Monday Night

TamaraDonnaMitzi
Now let's see what you've created this week!

(Psst....I'm picking the features next week & you know 
I'm a stickler for the rules, so take a quick peek...they're pretty easy)


Don't forget to enter my GIVEAWAY before you leave today~

Party Every Monday Night


Thanks for partying with us!

Sunday Inspiration


Friday, October 17, 2014

Yoga Socks

This project is definitely in the quickie crafts category, taking less than 10 minutes to make~

Sewing, DIY, Make your own Yoga Socks, fleece socks


These little foot covers are meant to keep your joints warm and cozy but still give you room to grip your yoga mat while stretching out into all your crazy yoga poses.

Here's what you need to make your own Yoga Socks in no time flat.


Materials:
-stretchy material like T-knit or fleece
-measuring tape
-scissors
-standard sewing kit
-optional: if your fabric isn't stretchy enough just add some elastic to this list

Steps:
1) You'll need to take a couple of quick and easy measurements before you get started.  First of all, measure from the bottoms of your toes up to where you want your socks to end on your leg.


2) Now measure around your leg where you want your socks to end.


3) Using these two measurements cut 2 pieces of fabric into a square as shown below.


4) With right sides together, fold the fabric into two long rectangles.
 5) Using a 1/2" seam allowance sew the long cut edge so that you make two long tubes.


6) Turn right side out.  Slip the tube onto your foot and mark approximately where your heel hits the seam allowance (place the seam allowance along the bottom of your foot and back of your leg).

Take the tube off and the cut across half of your tube so that you have a slit in the back.


That's it!  You're done!


Now, when I have more time and I redo this project I will most likely finish my cut edges with a seam and maybe cut my rectangles so that they curve in a bit at the ends so they fit a little more snugly.

Also, if you find that your socks are slouching down on you, just make a small casing at the top of the top and thread in some elastic to keep them in place.

Are you a yoga master?  To be honest I'm more of a pilates girl myself but I know these will still come in handy while I'm doing my hundreds.

Namaste everyone~

PS....don't forget to enter the giveaway going on RIGHT NOW!  (Closing October 21, 2014)

Linkwithin

Related Posts Plugin for WordPress, Blogger...